 So, Day 6 was another easy one. I just got each girl a 6 pack of Dr. Peppers, put them in cute gift boxes and Ta-Da! Very easy but also very appreciated too.
 Wednesday, December 22, 2010
12 Days of Christmas - Day 6
So, Day 6 was another easy one. I just got each girl a 6 pack of Dr. Peppers, put them in cute gift boxes and Ta-Da! Very easy but also very appreciated too. 12 Days of Christmas - Day 5
On the Fifth day of Christmas my true friend gave to me...Five matching ornaments for my tree!
 I didn't actually make any of these ornaments though. We have this wonderful nursery in town that really does it right for Christmas. They have their entire showroom crammed full with decorated trees. So many trees, so many themes, so many ideas! I went and chose 5 ornaments a piece for each of my girls. My youngest daughter has her house decorated in bright greens and red, so I chose ornaments in line with that color scheme...
 My oldest daughter has her house decorated in silvers and golds so I chose her ornaments in line with that color scheme as well...
 They love their new ornaments and they both said they look great on their tree! Woo Hoo!
12 Days of Christmas - Day 4
OK, so Day 4 was my easy day. Regardless of that, my kids still really enjoyed them. Here is what I did:
 I just went into my stash of home made cards, picked out 4 per girl and voila! Day 4 was done. I chose a Birthday card, a Thank You card, a New Baby card, and a Non-specific card. I really think it was perfect actually. They now have 4 cards to give out whenever they are in a pinch and need a card. I make these cards at card classes I attend from my wonderful Stampin Up and Close to my Heart dealers. I love both of those ladies and those cards are so handy!
 I just went into my stash of home made cards, picked out 4 per girl and voila! Day 4 was done. I chose a Birthday card, a Thank You card, a New Baby card, and a Non-specific card. I really think it was perfect actually. They now have 4 cards to give out whenever they are in a pinch and need a card. I make these cards at card classes I attend from my wonderful Stampin Up and Close to my Heart dealers. I love both of those ladies and those cards are so handy!
Tuesday, December 21, 2010
Featured on Whipperberry
So, I know I have missed the mark on posting the remainder of my 12 days of Christmas but I do promise I'll post them soon. In the meantime though, guess what? I was chosen as a favorite on the Whipperberry website! Can I hear a Woop Woop? Yep, they liked my ribbon trees. Those weren't actually my favorite either. Just wait until I post the remaining projects I've done. I am just so humbled that they picked me though because the ladies over there at Whipperberry are some pretty amazing women! Thanks!

Wednesday, December 15, 2010
12 Days of Christmas - Day 3 - Three letter hanging to bring joy for all to see
 OK folks, it's day three on my 12 days of Christmas. Today's gift for my kids was phrased like this: On the Third day of Christmas my true friend gave to me...a Three letter hanging to bring JOY for all to see. I really love how these turned out and this was actually my very own idea! I didn't "borrow" this from anyone else's blog. hee hee So, this is what you will need to make this on your own:
 Supplies: Blank cardboard coasters
Christmas themed scrapbook paper
Chipboard letters of J, O, and Y
Embellishments of your choice
Adhesive
X-Acto knife
Ribbon of your choice
Emery board or some other type sanding medium
Ink pad of your choice.
Cropodile
Cropodile
 I got these chipboard coasters online. I just did a search for drink coasters and compared all the prices and bought 100 at the cheapest place I could fine. That ended up being HERE
I got the small square ones. They were $8.00 for 100 of them. Super fast shipping too I might add. So, the first step is to put some adhesive on one side of the coaster and adhere it to the backside of the paper you chose.
 Use your x-acto knife to trim along the edges to cut it out. Then put some adhesive on the other side of it and adhere the other side to the same backside of the paper. Cut it out as well
I'll be honest here...I staged these pictures. I'm not left handed. In fact I'm SO right handed that I couldn't even hold the camera with my left hand to take a picture so I "staged" it in my left hand and then took the picture with my right. But you get the idea! :)

 The next step is to sand down the edges to remove any loose or overlapping paper. I just use a store bought emery board for this. You can buy fancy smancy sanding tools specifically for scrapbooking and paper crafts but these work just as well and cost a fraction of the price. Anyway, sand all the edges. I try to sand a little of the edge to give it a vintagey aged look.
(My husband had to take this picture because I couldn't hold both the coaster and the emery board to show this and take a picture. He's such a trooper! I think I'll keep him!)
 When you are finished sanding, you will have something like this:
 Next, you can skip this next step or do it either way. But, I distress it at this point. All this means is I rub the edges with some ink to give it an aged, distressed look. I use Stampin Up Creamy Caramel ink for this. It gives the perfect aged look in my opinion.
 Make sure you get both sides too. After distressing your piece will look something like this:
 Continue with all of your coasters. You will need at least 3 in different but coordinating papers. You could use the same paper as well but I prefer different papers.
 These are my completed pieces. So, the next step is to align them up in the order you want them. I liked the red on top, the holly print in the middle and the green music print on the bottom.
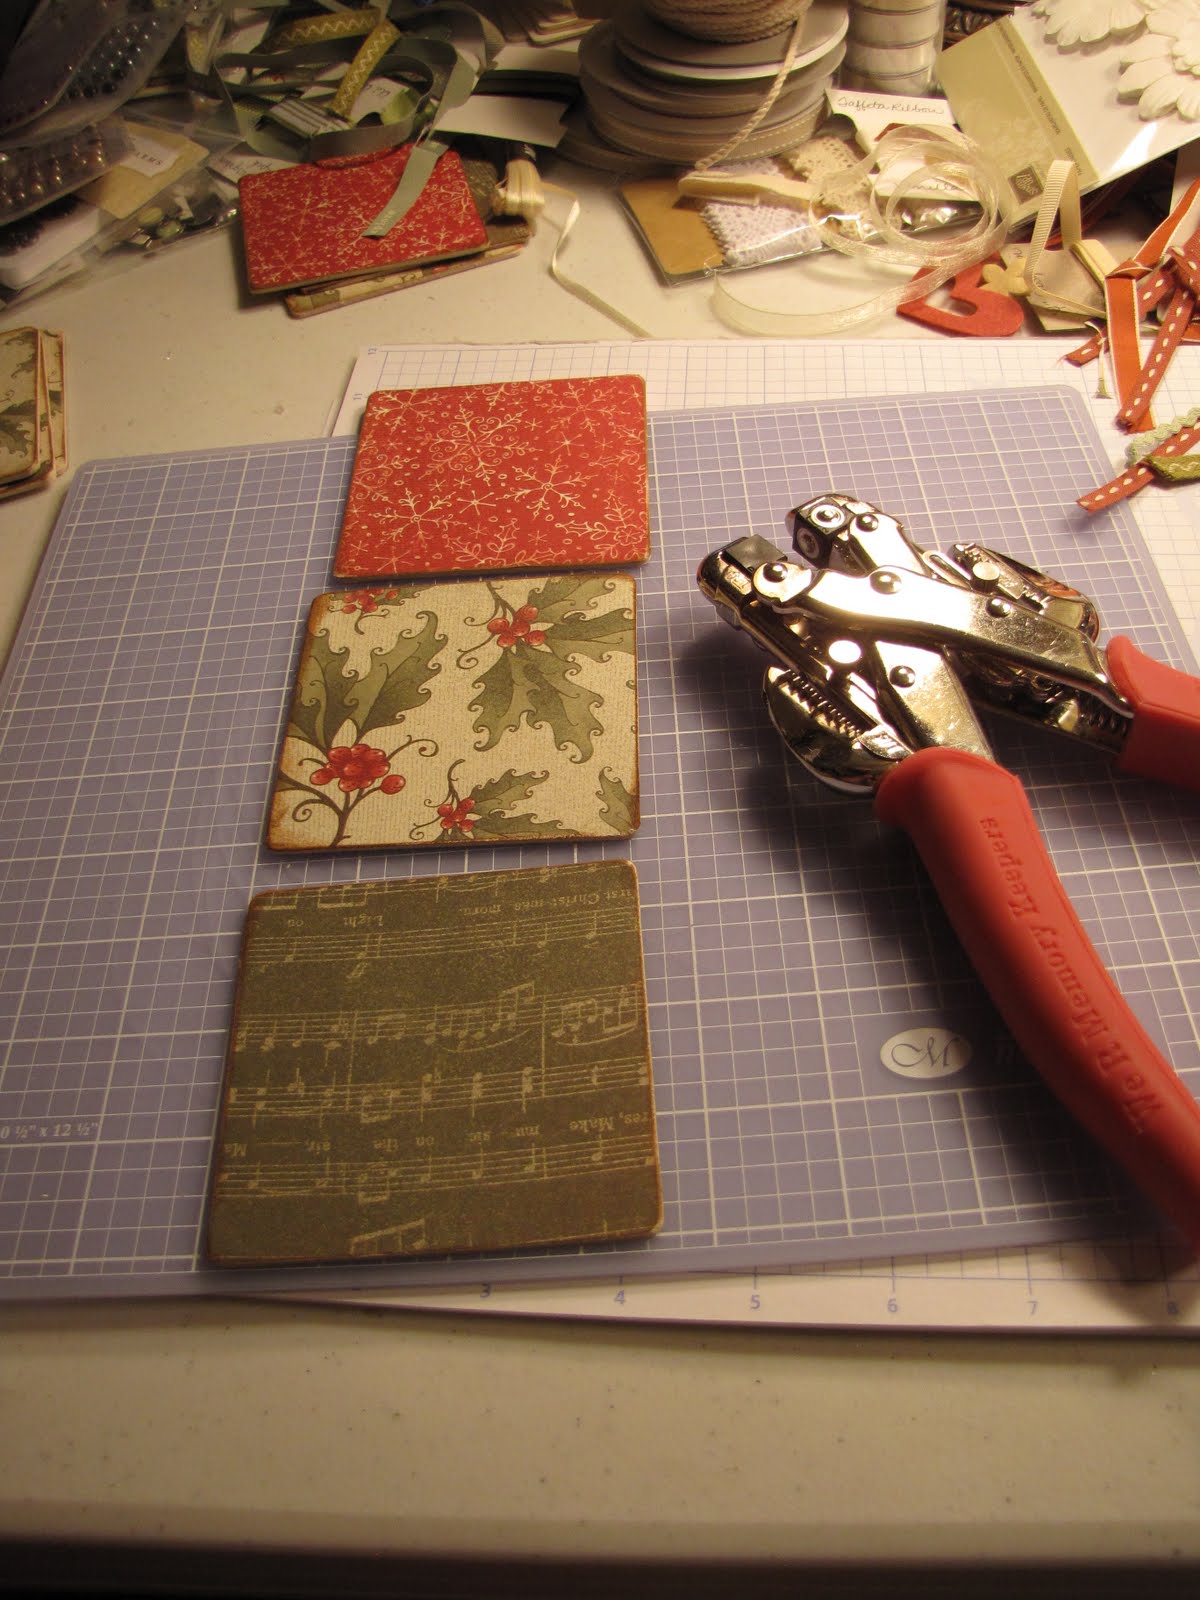 Now, it's time to punch the holes. You really need a Cropodile for this. If you have another method of punching holes through chipboard then do whatever works for you but for me, the cropodile is the tool of choice and man it goes quick and easy with this puppy.
 Adjust the back stop for the larger hole punch on the cropodile so that your holes will be about half an inch to an inch in from the edge. You will need 2 holes on each opposing side of both the red and holly print and only on one side of the green. Like this:
 The next step is to add your letters and embellishments. I found sheets of single letter chipboard from my Close to my Heart dealer. Woo Hoo!!!! No wasted letters. I bought 3 sheets each of J, O, and Y. I picked out the letters at random trying hard to mix up the fonts and not have any matching fonts. The sheets of letters come with all sorts of sizes and fonts. I was able to use all but 1 of each of them. Only one was too big. I also used the negative of some of the letters as well. Just use your adhesive and adhere the letters to each of your pieces in order of course to spell JOY.
 You can use any embellishments you want. I tried to keep it pretty simple with these. First of all I think the papers are so beautiful that I didn't want to cover them up with too many embellishments and like they say "less is more." So, keep it simple but give each piece just a little bling to jazz it up a little.
 Next, it's time to tie it all together. Use ribbon of your choice to tie each of the pieces together and to make a hanging loop at the top. I mixed up the ribbon and just used whatever I had.
I really liked the twine like ribbon I had the best. It was easy to tie as well. For my ribbon I used old scraps of ribbon I had too. I didn't buy anything for this project except for the coasters and the letters. Everything else I already had from my scrapbook hoarding! ha ha ha However, if you do have to buy everything to do this just get 3 different ribbons to match your paper.
 That's it!
 The best part? The back side is covered in pretty paper too. You can put pictures on the back side on each one. If you will be hanging this where it will be seen (like on your Christmas tree) I think it would look really cute to have pictures on the back side.
 A close up of the finished product:


These are so cute, so quick, and so easy! I'm making quite a few. I made 4 of these last night from start to finish in 2 hours. I was talking to my hubby and watching TV while I did it so I'm thinking if you really got down to business you could do it in less time even.
 I mixed things up quite a bit with each one and just played with all of my "stuff" to come up with different embellishing ideas for each one. I didn't want any 2 to be exactly alike.
I really liked the twine like ribbon I had the best. It was easy to tie as well. For my ribbon I used old scraps of ribbon I had too. I didn't buy anything for this project except for the coasters and the letters. Everything else I already had from my scrapbook hoarding! ha ha ha However, if you do have to buy everything to do this just get 3 different ribbons to match your paper.
 That's it!
  The best part? The back side is covered in pretty paper too. You can put pictures on the back side on each one. If you will be hanging this where it will be seen (like on your Christmas tree) I think it would look really cute to have pictures on the back side.
 A close up of the finished product:


These are so cute, so quick, and so easy! I'm making quite a few. I made 4 of these last night from start to finish in 2 hours. I was talking to my hubby and watching TV while I did it so I'm thinking if you really got down to business you could do it in less time even.
 I mixed things up quite a bit with each one and just played with all of my "stuff" to come up with different embellishing ideas for each one. I didn't want any 2 to be exactly alike.
So, that's it. My day 3 gift to my kids, as well as my gift to my nail lady and my hairdresser and some of my friends and family too. I hope you enjoyed it.
Tuesday, December 14, 2010
Tasty Tuesdays - 12 Days of Christmas Day 2
OK folks, it's Day 2 on my 12 Days of Christmas to my kids. I really love this though, because my Day 2 thingy-ma-bop actually coincides with my theme for Tuesdays...TASTY! I love it when a plan comes together! (quick, what show is that from?...answer at the end of the post). Anyway, I had this grand idea that I wanted to give my kids 2 caramel apples for their 2nd day of Christmas gift. One for them and one for their husbands. Sounds simple enough right? WRONG! Apparently I live in the wrong town. There is no place in my humble little town that sells caramel apples. Can you believe? I called around yesterday morning to every place I could think of and no one had any! We don't have a Rocky Mountain Fudge Company store or anything like that. Before you start thinking "where in the middle of nowhere does she live?" Really, it's not that small of a town. We have a population of about 300,000 I think now but yet, no caramel apples. So, what is a mother to do? I really had my heart set on the caramel apples because my kids both love them. My children are not sweet eaters at all so any kind of candy, cookies, cakes they pretty much pass on. They do love fruit though and they especially love caramel apples. Had I had the foresight to think ahead and check ahead of time I would have found out that such things like caramel apples can not be found in this town and I could have made them myself. But, I didn't do that. So, on to Plan B. Behold Day 2 of the 12 Days of Christmas. The tag says: On the Second Day of Christmas my true friend gave to me...Two Red Crisp Apples with some caramel to make them sweet. Pretty cute if I do say so myself.
Behold...Day 2 of the 12 Days of Christmas. And, it's on Tasty Tuesdays too. What a coinkidink!


Have you figured out who you want to do this for yet? Did you go HERE and download these adorable tags yet? If not, you really need to do it! Maybe save them for next year if you can't do it this year.
PS The answer to the quote is...."The A Team" (the one back in the 70's!)
Monday, December 13, 2010
Scroll Down Please
I finally posted my tour of my Christmas decorated house but it posted it on the date I started it so it's showing up on the 8th. Please scroll on down to the 8th to check out my tour. I spent quite a bit of time on that post and uploaded a ton of pictures so go check it out. I'm sure there is a way to make it move to the top but I sure couldn't figure it out.
Make it Mondays - The Twelve Days of Christmas
So, I got this wonderful idea here for the Twelve Days of Christmas. I decided to take their idea and make it my own. I absolutely adore the free download tags though so I downloaded them, printed them and I'm using them for my tags too. I'll post the things I'm doing one per day so for one I don't spoil the surprise for my kids and two to keep you coming back for more! I'm tricky like that. I'm assuming you already guessed that I'm doing this for my kids. I've thought about doing something like this over the years in the past but this year I decided to just DO IT! I can't believe it either because my husband was totally on board with it and he loved the idea. Can you believe? Usually Hot Rod just rolls his eyes at all my "wonderful" ideas and shrugs his shoulders and says "whatever." This time though, there was no eye roll, no shrug, just a glimmer in his eye and he said "that's a great idea." I know! I almost fell over dead with a heart attack! ha ha ha
So, on to the 12 days of Christmas, Day 1. If you start today, you will end up giving one gift every day until Christmas day. I'm not doing expensive stuff at all. Each day is just something cute and personal to my kids. If anyone is reading this that I do not know (which I seriously, seriously doubt) my kids are grown and living on their own. They are both married and have their own houses. So, for day 1...

 Remember these trees? Yep, these are the same ones I posted about before. I still LUV them! I made each of my daughters one to match their holiday decor. My oldest daughter decorates in silver and gold and my youngest daughter has the lime green and red theme. I love how these turned out and I think they will look great in their homes.

I will be posting each day after I present them to my kids so in case my kids happen to come by here I won't be ruining their surprise. Actually I may be ruining it for my youngest child. She doesn't live in our same town anymore so I had to send her gifts to her today. I sent the first 6 days worth to her. She will get them tomorrow but I told her to just try and look at day 1 and day 2 only and save the rest for the rest of the week. She'll be coming here on Sunday so I'll get to give the rest to her in person.
I really hope my kids have fun with this. I know I have. So, what about you? Is there someone out there you want to do the 12 Days of Christmas for? Just keep in mind, the stuff I'm doing is not expensive at all! Most of it I'm making myself so it's just a little of my time and I really think it will brighten my kids day each day from now until Christmas. Check out that link I posted at the beginning of this post. She has some pretty great ideas. I actually only used one of hers though. I made up the rest of them to fit me and my kids.
Have fun!
Friday, December 10, 2010
Busy Busy Busy
Sorry for the lack of posting, I really do promise a very long post coming soon. But, this is a hint as to what's been taking up all my time when I'm not at work. The good news? They are finally done and ready to address and mail. Hopefully I'll get all my cards ready to go this weekend and can then finish my epic long Christmas decorating post. In the meantime...enjoy my Christmas cards. I had something else entirely in mind when I ordered my supplies this year for my Christmas cards, but my idea just didn't work out. So, on to Plan B. I got this idea from the Stampin Up catalog and just modified it a little to fit what I had. I really love the way they came out. There are 6 special ones for my kids, my parents, my in-laws, and my sisters. Everyone else gets the other one. I think they are both really cute though. I started making my own cards about 5 or so years ago and I love it. I just think my cards are a little extra special because they are truly hand made. Enjoy!


Wednesday, December 8, 2010
It's Beginning to Look A Lot Like Christmas!!!!!
I interrupt my regular schedule to bring you this special post. To say I'm a HUGE Christmas fan is an understatement. I love everything there is to love about Christmas, from the tree to the decorations to the food to the presents...basically Everything! When I was first married I would scrounge around for cheap decorations for my tree, but as we got older I just got more and more things to decorate with. Now (29+ years later) I decorate almost my entire house. Currently I have 15 decorated trees in my house. Yes...15! There is one in almost every room. The only room that doesn't have a tree is my spare bedroom (which I hope to remedy before my daughter comes to stay with us next week). So, I thought I would share a tour of my house. I'll start in the garage. I actually moved a tree into the garage this year. I started to think, Hot Rod and I enter and exit our house through the garage so shouldn't we be greeted by Christmas as soon as we come home? Why should everyone else get a festive greeting and not us. So, the Harley tree got moved to the garage this year. Yes, this is a Harley tree. We are such bikers and biker fans it was a no-brainer that we would have a tree dedicated to our main passion, motorcycles and Harley's in particular. Isn't it just so cute?

Now, entering into the house from the garage the first room you come to is the game room. Actually this year is my first year to put the village on the pool table. I started collecting the village pieces about 10-15 years ago and it has now grown to a thriving metropolis! It's no longer a small village with a couple of buildings, but a hustling and bustling town. I always think that Silver Bells should be playing! I have a few new additions to the village this year. The band is new as well as the brewery and the Irish pub. I have a rule to my village. Anyone is free to move people around but you have to have a story to go with it. So far there aren't many takers though. I guess I'm really the only one that actually thinks of all of the people as real people and the village as a real town. I know, I know...I'm crazy!


In the corner of the gameroom are the snowman trees. In the past I had a large snowman tree in my entry but I really shook things up this year. I retired quite a bit of things I've had and trimmed down the rest. However, a few things actually grew, starting with my Santa Claus collection. My Santa tree was promoted to the big tree in the entry and I decided to move the snowman tree to the game room but as 3 separate trees. I don't care who you are, you have to just put a smile on your face when you see snowmen. They are co cute! Don't you agree?

Leaving the game room, let's go back to the front of the house. This is the view that greets visitors to the front of our house. The 2 trees at the front door were given to us by Hot Rod's parents last year. They actually are supposed to be this large arch so there is a piece that goes between the trees and forms an arch. Unfortunately my porch is not tall enough for the arch but I still wanted to use the trees. Also unfortunately the trees just sort of stop at the top and not in a nice point either, they are flat at the top (where the arch actually connects to them) so my challenge was how to use them but make them look good with a flat top like that? Solution, make a really pretty topper that forms the peak that I'm looking for. I got the idea from another blogger and actually used it on the outside trees and my big "main" tree too. I really love it! These trees don't really have a bunch of things on them, just a few Christmas picks and lights, but I think they are perfect for outdoors. The wreaths are the same I've had for going on 5 years now I believe. I still love them and will probably use them for many years to come.

Now, coming into the house is my entry room. I have the Santa tree on the left when you enter. I love Santa Clauses and this tree has nothing but different Santa ornaments we've collected over the years. Santa Claus is just so...Christmas!

Actually this entire room is dedicated to Santa Clauses! The book case has all of the pictures of my kids with Santa over the years, all in different frames.
 I also have a china cabinet in our entry which I empty out and take out the glass doors every year. I use it as my display cabinet for my nativity scenes. My newest addition is the Peanuts set. They are adorable aren't they? Not only that but their hats come off and their arms and legs move.
 I also have a china cabinet in our entry which I empty out and take out the glass doors every year. I use it as my display cabinet for my nativity scenes. My newest addition is the Peanuts set. They are adorable aren't they? Not only that but their hats come off and their arms and legs move.

Moving along, next is what I refer to as "the piano room". We don't have a mantel in our house so I use the the top of the piano as our "mantel". Our stockings are hung here and this is one of the places where I really go "all out" in my definition. I didn't really count these trees either in the 15 trees in the house. So, if you do count them then the total goes up to 19 trees. :)


If you turn to the left from the piano you will see my dining room table. I keep it decorated throughout the season. My color scheme for most of the house this year is Red and Gold and I kept with those colors on the table. I like using chargers on the table because it gives the impression that the table is set but the dishes aren't out getting dusty.

 I also changed out my "Thankful" wall hanging to go with the season. I love it! The colors of course match everything else. I just love this thing. It gives me a chance to change things out once a month without really changing a whole lot.

Moving on to the living room. This is the grand daddy of them all of trees. I changed this year to the red, gold, and white theme. I left quite a few ornaments off that didn't fit the color scheme this year. Normally my big tree has all of the ornaments we've collected over the years but I just wanted to do something different this year. I love it too! We had an angel at the top of our tree since my kids were babies. However, with this tree she never really sat well at the top of it. The top of the tree was just to big to fit in the small hole on the bottom of the angel. I sort of made it work for the last couple of years but this year I got a new idea from a fellow blogger and decided to go with it for the top of the tree this year. I went to Hobby Lobby, picked out a few decorative "flowers" and other type of things. I found these in the single flower section, not the Christmas section. I was hoping to find a long white feather but they didn't have that so I settled for the red ones. I think they add that special touch. The Merry Christmas at the top I actually made. I was hoping to find the wooden and decorated Merry Christmas but the ones in Hobby Lobby were all gone except for 2 broken ones. I looked at Wal-Mart and they didn't have a single thing so I decided to make my own. I bought the individual letters at Hobby Lobby in the unpainted wood section. I used Gorilla glue and glued the letters together to form the words. Then I spray painted them red. They actually held too. They are a little fragile but they held together and I just placed the words at the top. The branches hold it in place. The presents are wrapped in a pattern as well. I choose a separate wrapping paper for each family. My oldest daughter and son-in-law have one paper, my youngest daughter and son-in-law have a different paper, and me and my husband have a third paper. I wrap presents for other family members also in coordinating papers, but I keep them under the Santa Claus tree in the front room to make it easier when we go to our parents for Christmas time. I can just grab presents by the paper and go. It is super easy this way and it also looks really good too. I spent quite a bit of time on the wrapping this year. We are not giving as many gifts this year because we are taking the kids to New York for the week after Christmas so I wanted the gifts to be extra pretty instead!


 I bought these snowflakes last year after Christmas at Pier One for $1.75 each! What a deal! At the time I thought I would paint them white but when I got them out this year I just really loved the natural wood with the glitter on them. I set them on our coffee table and just surrounded them with some fake greenery and a couple of silk poinsettias to go along with the big tree in the room. I like how it turned out. Simple but elegant.
So, from here we go back through the dining room and into the kitchen. The kitchen tree is all about kitchen stuff. I found most of the ornaments from LTD one year. There are eggs, pans, muffins, etc. Since then I've found a few more kitchen type ornaments to add to it too. I decided to use kitchen towels for the tree skirt this year too. I thought it just went well with the kitchen theme! I finally found a topper for the tree but I took this picture before I got it. I found this cute gingerbread face with a chef's hat on it and scarf. It looks super cute so fear not, even though the tree doesn't have a topper here, it does now! I'll try and post more pictures of it later. I also put a table runner on the table and scattered some pecans along the base of the tree too.

Leaving the kitchen is my room. Now this tree still needs a little love. I just am not feeling it. It's what I call the "romance" tree. It has browns and golds to match my room. I'm just not happy though. I think it still needs...something. I'm going to add some ribbon and see what that does. What do you think? What does it "need"?

Leaving the kitchen is my room. Now this tree still needs a little love. I just am not feeling it. It's what I call the "romance" tree. It has browns and golds to match my room. I'm just not happy though. I think it still needs...something. I'm going to add some ribbon and see what that does. What do you think? What does it "need"?

The hall bathroom in our house has a red, black, and white color scheme year round. The walls are red and the black and white are thrown in with accessories, towels, shower curtain, floor, etc. So, what goes in a red, black, and white room? A Texas Tech tree of course! We are Tech fans all the way so we had to have a TTU tree! I just can't believe how expensive college sanctioned ornaments are though! They are so proud of those puppies. I have a few but then I also added just some generic red and black ornaments. My daughter also made me some painted glass ball ornaments as well. I finally found a topper for this tree too! Yippee Skippy! I've been looking for one for this tree for going on 3 years now and I finally found something I liked. It's a snowman face with a TTU hat on and he's holding a little frame that says Go Red Raiders. Again, I'll take a new picture soon and post it now that this tree is no longer topless! ha ha ha

After the bathroom is my scrapbook room. This tree is what I call the "handmade" tree. Every ornament on this tree was made by my inlaws. They started making ornaments for everyone in 1982. We've received an ornament every year since then. They are all made out of wood and they cut them out and paint them. I put the star at the top of the tree this year. I hadn't thought of using it before as the topper and it just came to me this year to use it as the topper. I think it's so cute too.
And...last but certainly not least is the laundry room. These are probably my favorite trees besides my main tree. I just think they are so adorable. There are 3 trees in here. Each tree has a clothesline garland wrapped around it. One has Santa's laundry on it, one has Mrs. Clause's laundry, and one has the elf's laundry! I found a stuffed Santa, Mrs. Santa, and Elf to top the trees too. They are waiting for their laundry to dry. I want to find some more "Santa clothes" to pile up on the base of the trees as their skirt but I haven't found any yet. I thought it would look really cute to have laundry piled up like they are waiting to be washed. I got the garlands from Avon (I sell Avon too) but they don't have them anymore. I could kick myself for not buying more of them when I had the chance too. The "clothes" are actually on the lines with real mini clothespins so if I had the foresight to get more of them I could have taken them off the lines and just used them to pile up as the tree skirt to make it look like loads of laundry. I even thought of making one pile the darks, one the lights, and one the "handwash undies". But...alas, I'm outta luck. I'm going to see if I can find them on ebay or Craigs list or something though. I seriously WANT more of them!


 So, that's it. That is a tour of my Christmas inspired house. I hope you got some good ideas out of it or if not I hope you just got a smile out of it and it put you in a Christmas mood. I know that is what it does to me each time I walk through the doors!
Merry Christmas!
Subscribe to:
Posts (Atom)