I'm really sorry for the lack of posting. If it's any consolation I hope to have tons of posts for next week ready. I've been working on them, really I have, but they just aren't ready for publishing yet. I thought I would do a small post today though to let everyone know I'm still alive and well. Albeit a little a swamped side right now. But I digress...
Every year I have Thanksgiving at my house. My entire family comes to my house to eat. We have the biggest house so I'm able to put up tables and everyone can actually sit at a table. I usually assign different things for people to make but still end up cooking a lot of the dinner myself. Well this year I decided to try to make my own cranberry sauce and I am totally happy with the results. I realize Thanksgiving is over but maybe you can use this recipe for your Christmas dinner. Sorry, I don't have pictures to share.
Cranberry Sauce
2 12 oz packages of fresh cranberries
1 cup of water
1 cup of sugar
1 cup diced apple
1/2 cup chopped walnuts
1 teaspoon cinnamon
1/2 teaspoon nutmeg
Juice of 1/2 an orange
Juice of 1/2 a lemon
(I also added the zest of the orange)
Heat the sugar and water in a sauce pan until all of the sugar is dissolved. Add the cranberries and heat until boiling. Add the remaining ingredients and bring back to a boil. Reduce the heat and simmer for 15 - 20 minutes. Remove from the heat and allow to cool completely.
That's it! It is incredibly easy and so delicious too! Everyone raved over it.
I hope everyone else had a great Thanksgiving and you are gearing up for Christmas now. Enjoy the season!
Tuesday, November 30, 2010
Monday, November 22, 2010
Make-it Mondays - Ruffle Trees

I got this great idea from here Check her out sometime, she has some awesome ideas. Anywho, I saw this idea and immediately fell in love, so I decided to make them for co-workers, friends, club members, family...oh heck everyone I know is probably going to get one for Christmas. Shhhh...don't tell them! :)
So, here's a quick list of what you will need:
Styrofoam cone shape (whatever size you want)
Ribbon or fabric
A sewing machine...or not perhaps
A wooden candle stick - purchased at Hobby Lobby in a bag of 6 for $3.47
A wooden finial - purchased at Hobby Lobby in a bag of 3 for $1.47
Wooden bases - purchased at Hobby Lobby for $.99
Hemp or twine or some sort of tieing type stuff
Jingle bells
Glue gun with glue sticks
Spray paint

Step 6: Glue the candle stick to the base. Then glue the candle stick to the tree. I actually ended up cutting a dowel rod that fit in the candle sticks, glued that inside the candle stick and then stuck the dowel rod into the tree and glued it there as well. I wanted to make sure it was more secure
 Step 7: Glue the finial to the top of the tree.
 Step 8: Wrap the twine around the top of the tree to hide any imperfections, leaving 2 long strands. Tie a jingle bell to each loose end.
 Tada! That's it. These are a few of my finished ones. I haven't put the bases on the smaller trees yet because I wanted a slightly smaller base for them.

So, here's a quick list of what you will need:
Styrofoam cone shape (whatever size you want)
Ribbon or fabric
A sewing machine...or not perhaps
A wooden candle stick - purchased at Hobby Lobby in a bag of 6 for $3.47
A wooden finial - purchased at Hobby Lobby in a bag of 3 for $1.47
Wooden bases - purchased at Hobby Lobby for $.99
Hemp or twine or some sort of tieing type stuff
Jingle bells
Glue gun with glue sticks
Spray paint
Step 1: Spray paint the wooden bases, candle sticks, and finials in a color of your choice. I stuck with an Ivory White. I liked the look of it and I really think it makes it a little bit country chic.


Step 2: While the paint is drying, take the ribbon and sew a single line down the edge of it. I really didn't measure how much I did, I just kind of guessed at it and sewed it. If I were to guess now I would say I probably did 2-3 yards. Step 3: Gather the ribbon. You do this by grabbing one of the loose threads at one end of the sewed line and pull gently. You will only grab one, not both of the loose threads. Just continue to pull and gently move the fabric until you get the desired look. If you have a ruffling foot for your sewing machine alls the better, but I don't have one of them. :( I kind of doubt they make such a thing for the cheapy sewing machine I have either. I was thinking though that you could maybe do this tree without sewing, just by gathering wired ribbon yourself. It would be a little harder but I think it could be done. I'm going to stick with the sewing to make it easier on myself though.
 Behold, the gathered ribbon. For this tree I chose 2 different colors of ribbon in a coordinating color palate. I gathered each one.
 Step 4: Glue ribbon to tree form. Start at the bottom with one of the colors of ribbon and start by putting a line of glue on the bottom of the cone. Glue the fabric to the cone. At the end, cut the ribbon and then glue the loose end to the beginning.
 Step 5: Repeat this process with the other ribbon. Then alternate all the way up the tree.
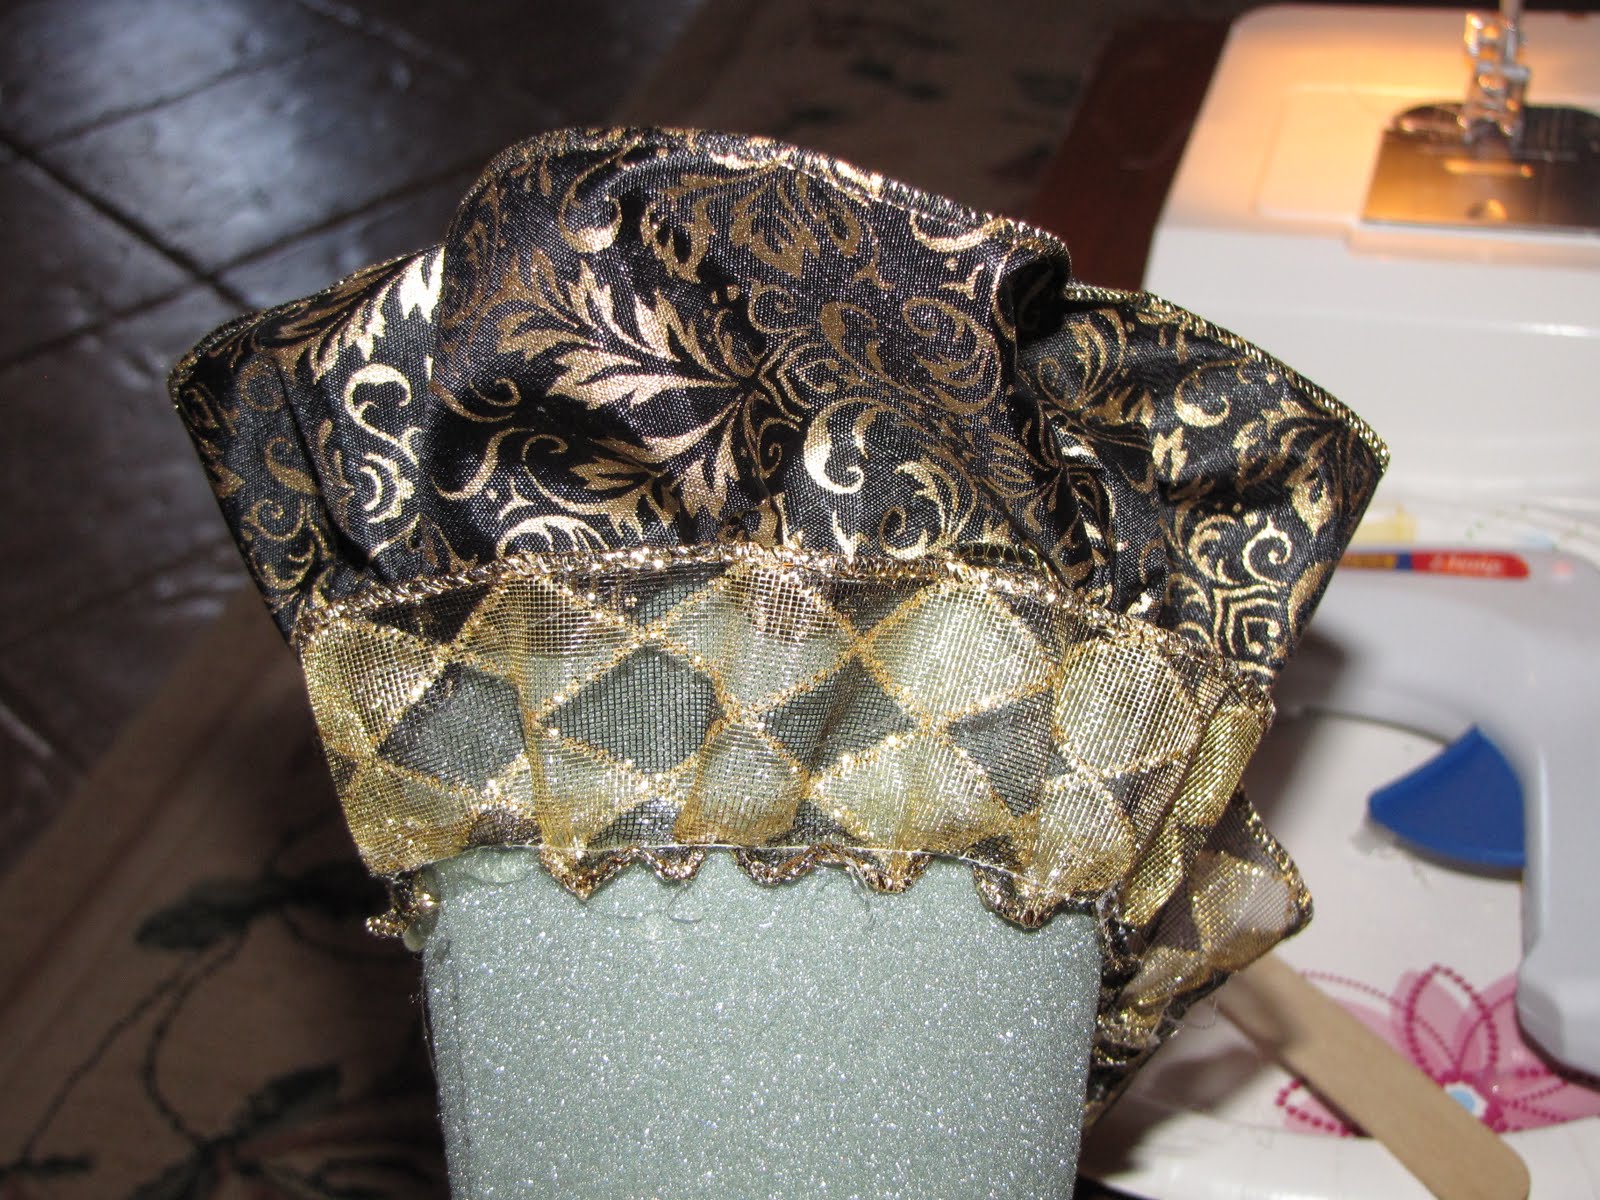 The tree will look like this when it's completely wrapped. The top gets a little tricky but just be patient and it will work out. Remember this is a "work of art"...mistakes add character right?

Step 6: Glue the candle stick to the base. Then glue the candle stick to the tree. I actually ended up cutting a dowel rod that fit in the candle sticks, glued that inside the candle stick and then stuck the dowel rod into the tree and glued it there as well. I wanted to make sure it was more secure
 Step 7: Glue the finial to the top of the tree.
 Step 8: Wrap the twine around the top of the tree to hide any imperfections, leaving 2 long strands. Tie a jingle bell to each loose end.
 Tada! That's it. These are a few of my finished ones. I haven't put the bases on the smaller trees yet because I wanted a slightly smaller base for them.
Thursday, November 18, 2010
Trash to Treasure Thursday - Our Closet and Bathroom Makeover
For those that may not know me and have just happened upon this site (far fetched I know but hey I can dream can't I?) I live in a very old house. We moved into this house in 1989. Since that time we have been fixing and remodeling the entire house. I have plenty of pictures of what we like to refer to as "The Big Renovation of 1996" but all of those pictures are pre-digital days and I just haven't taken the time to scan them to share. But, I thought I would share our latest project. Our Master Bathroom and Closet.
So to set the stage...like I said we live in a very old house. The original house was built in the early 50's I believe. It was a typical farm house, 2 bedrooms, one bathroom, a living room, and a kitchen. Sometime in the 60's I think they added on to the house and added a room in front of the living room. After that, they added on again and added a very large extension. I'm not sure how the original owners used the rooms but for us the original living room is now our master bedroom. The room next to that has been serving as our closet since about 1991 or so. The room itself used to have the front door to the house and windows in it. Those were boarded up when the large extension went in. It's hard to explain so I hope you can get the idea from my explanation.
Anyway, the room next to our master bedroom is just basically a blank empty room. I had put up rods all around the room for our clothes. The windows of the original outside of the house were boarded up as was the door. Outside that wall is now the entry room to the house. We did add the octogon windows.
So, I hope you noticed in the original description of the house that I said the house had one bathroom. Yep, that's right...3700 square feet and ONE bathroom. However horrible that may sound the good news was that one bathroom is HUGE and we just learned to deal with it. With 2 daughters and myself we all had vanity's in our rooms. All make-up and hair was done in your rooms. The bathroom was for "necessity" usage only. But, it was time to do something about this...room...outside of our master bedroom. We had always envisioned it to be a master bathroom and closet. Well this year that vision became reality! I'm completely happy with the transformation so I thought I would share. I hope you can realize that you can take a really trashy space and transform it into something beautiful. Behold...
This is the room pre-makeover. Actually, this picture below was taken after I had taken down one set of the rods. I had taken it down and then snapped...oh yeah...get some pictures. So, there was actually a set of rods over there on that wall of old windows. My husbands suits are all custom made and putting them on this rack even temporarily freaked him out! ha ha ha And, yes, those are my shoes on the shelves there. I freely admit I have a serious shoe addiction.
 Notice the disgusting floor and old as crap panelling. Gotta love how they did things in the 60's and 70's. Whoever designed cheap panelling should have been shot in my opinion!
 This is the entry looking into our bedroom. It is actually very nice looking except for the carpet. We will be putting down wood floors soon. They are purchased even, we just haven't had the time to empty the room to get them done.
 The last "Before" picture. As you can see this room needed some serious TLC.
 Now...to the afters....
So to set the stage...like I said we live in a very old house. The original house was built in the early 50's I believe. It was a typical farm house, 2 bedrooms, one bathroom, a living room, and a kitchen. Sometime in the 60's I think they added on to the house and added a room in front of the living room. After that, they added on again and added a very large extension. I'm not sure how the original owners used the rooms but for us the original living room is now our master bedroom. The room next to that has been serving as our closet since about 1991 or so. The room itself used to have the front door to the house and windows in it. Those were boarded up when the large extension went in. It's hard to explain so I hope you can get the idea from my explanation.
Anyway, the room next to our master bedroom is just basically a blank empty room. I had put up rods all around the room for our clothes. The windows of the original outside of the house were boarded up as was the door. Outside that wall is now the entry room to the house. We did add the octogon windows.
So, I hope you noticed in the original description of the house that I said the house had one bathroom. Yep, that's right...3700 square feet and ONE bathroom. However horrible that may sound the good news was that one bathroom is HUGE and we just learned to deal with it. With 2 daughters and myself we all had vanity's in our rooms. All make-up and hair was done in your rooms. The bathroom was for "necessity" usage only. But, it was time to do something about this...room...outside of our master bedroom. We had always envisioned it to be a master bathroom and closet. Well this year that vision became reality! I'm completely happy with the transformation so I thought I would share. I hope you can realize that you can take a really trashy space and transform it into something beautiful. Behold...
This is the room pre-makeover. Actually, this picture below was taken after I had taken down one set of the rods. I had taken it down and then snapped...oh yeah...get some pictures. So, there was actually a set of rods over there on that wall of old windows.
 My husbands suits are all custom made and putting them on this rack even temporarily freaked him out! ha ha ha And, yes, those are my shoes on the shelves there. I freely admit I have a serious shoe addiction.
 Notice the disgusting floor and old as crap panelling. Gotta love how they did things in the 60's and 70's. Whoever designed cheap panelling should have been shot in my opinion!
 This is the entry looking into our bedroom. It is actually very nice looking except for the carpet. We will be putting down wood floors soon. They are purchased even, we just haven't had the time to empty the room to get them done.
 The last "Before" picture. As you can see this room needed some serious TLC.
 Now...to the afters....
BEHOLD, our new master bathroom and closet.
 We wanted a tall, extra wide toilet and we actually had to special order it and then travel 2 hours to pick it up. It is worth it though. I love that thing. The sink we got at Lowes. It was exactly what I was looking for and it came complete with the counter top and sink. It was the perfect one and the price was just $425. If you've priced bathroom vanities you know that is an awesome price. Well, we told them we wanted it and they showed to have one in stock but they couldn't find it. They tried to sell me a different one at a discount but I was adamant...I wanted THIS one. So, they sold me the floor model and also gave it to me for an additional 20% off. The shower is my pride and joy. I love the glass walls. We decided to go with the no-trim walls. They are fabulous. We just use a squeegee after every shower and they stay really clean. What you can't tell from the picture though is we had heated floors installed. At the time the hubs said he wanted them I thought, whatever. Now? OMG...they are divine! I love them. It feels so good to walk in there in the morning and not have to feel cold tile.
 Now on to the closet. Everything you see was purchased at Ikea and we put it all together. We don't actually have an Ikea in my little town so we had to drive 6 hours pulling a trailer to get it all but it is so worth it. I love my closet now.

 I have all of my t-shirts, workout stuff, and sweaters in the drawers.
All of my purses are in those decorative boxes on the top shelves which I also purchased at Ikea. I also have a key which lists what purse is in what box so I can just reference my list when I want a specific purse.

So, that is our new bathroom and closet. We did not do all of the tile, electrical, or plumbing ourselves. We contracted that out and frankly I'm glad. We have done quite a few project ourselves in our house including all of those things but this time we just didn't have the time to spend on it so we paid to have that done. I'm so glad we did too. However, don't let that deter you. If you have the time and the patience, you could do it. The internet is a wonderful source of "how-tos'.
 We wanted a tall, extra wide toilet and we actually had to special order it and then travel 2 hours to pick it up. It is worth it though. I love that thing. The sink we got at Lowes. It was exactly what I was looking for and it came complete with the counter top and sink. It was the perfect one and the price was just $425. If you've priced bathroom vanities you know that is an awesome price. Well, we told them we wanted it and they showed to have one in stock but they couldn't find it. They tried to sell me a different one at a discount but I was adamant...I wanted THIS one. So, they sold me the floor model and also gave it to me for an additional 20% off. The shower is my pride and joy. I love the glass walls. We decided to go with the no-trim walls. They are fabulous. We just use a squeegee after every shower and they stay really clean. What you can't tell from the picture though is we had heated floors installed. At the time the hubs said he wanted them I thought, whatever. Now? OMG...they are divine! I love them. It feels so good to walk in there in the morning and not have to feel cold tile.
 Now on to the closet. Everything you see was purchased at Ikea and we put it all together. We don't actually have an Ikea in my little town so we had to drive 6 hours pulling a trailer to get it all but it is so worth it. I love my closet now.
 I have all of my t-shirts, workout stuff, and sweaters in the drawers.
 All of my purses are in those decorative boxes on the top shelves which I also purchased at Ikea. I also have a key which lists what purse is in what box so I can just reference my list when I want a specific purse.

So, that is our new bathroom and closet. We did not do all of the tile, electrical, or plumbing ourselves. We contracted that out and frankly I'm glad. We have done quite a few project ourselves in our house including all of those things but this time we just didn't have the time to spend on it so we paid to have that done. I'm so glad we did too. However, don't let that deter you. If you have the time and the patience, you could do it. The internet is a wonderful source of "how-tos'.
So, have a great Trash to Treasure Thursday.
Monday, November 15, 2010
Make it Mondays - Seasonal Shadow Box
I have this shadow box hanging in my dining room. I got the vinyl words from my wonderful Stampin Up demonstrator which I put on the glass of a store bought shadow box I bought at Hobby Lobby. I try to switch out the backing every month to go along with each season. The one for Halloween was this one:
 So, it was time to change it up a little. I started by getting the paper cut. I put it on the back of the shadow box with straight pins. The back has got a black velvet material over some batting so the straight pins work great to just temporarily attach the paper to the back.
 Next, I added some 3 dimensional elements that I also bought at Hobby Lobby. I just attached them to the paper with my favorite hot glue gun.
 Next, I made a sort of platform for the bottom. I cut some styrofoam the length of the frame and then covered it in a matching paper. I covered it just like I was wrapping a present.
 After I put the glass in the frame, I put the "platform" in. I wanted this there so I could add another element to the design. I bought this wonderful wooden turkey on a long dowel so I just pushed the dowel into the platform which held it in place.

The turkey had to be put facing outward of course.
 Then I just put the paper covered back on it and hung it up. Voila! A new seasonal wall hanging.

Here it is with the entire wall grouping. I know, I know...whoever put that plug there in the middle of the wall should be shot! Oh well, the joys of owning an old farm house! ha ha ha

 So, it was time to change it up a little. I started by getting the paper cut. I put it on the back of the shadow box with straight pins. The back has got a black velvet material over some batting so the straight pins work great to just temporarily attach the paper to the back.
 Next, I added some 3 dimensional elements that I also bought at Hobby Lobby. I just attached them to the paper with my favorite hot glue gun.
 Next, I made a sort of platform for the bottom. I cut some styrofoam the length of the frame and then covered it in a matching paper. I covered it just like I was wrapping a present.
 After I put the glass in the frame, I put the "platform" in. I wanted this there so I could add another element to the design. I bought this wonderful wooden turkey on a long dowel so I just pushed the dowel into the platform which held it in place.
The turkey had to be put facing outward of course.
 Then I just put the paper covered back on it and hung it up. Voila! A new seasonal wall hanging.
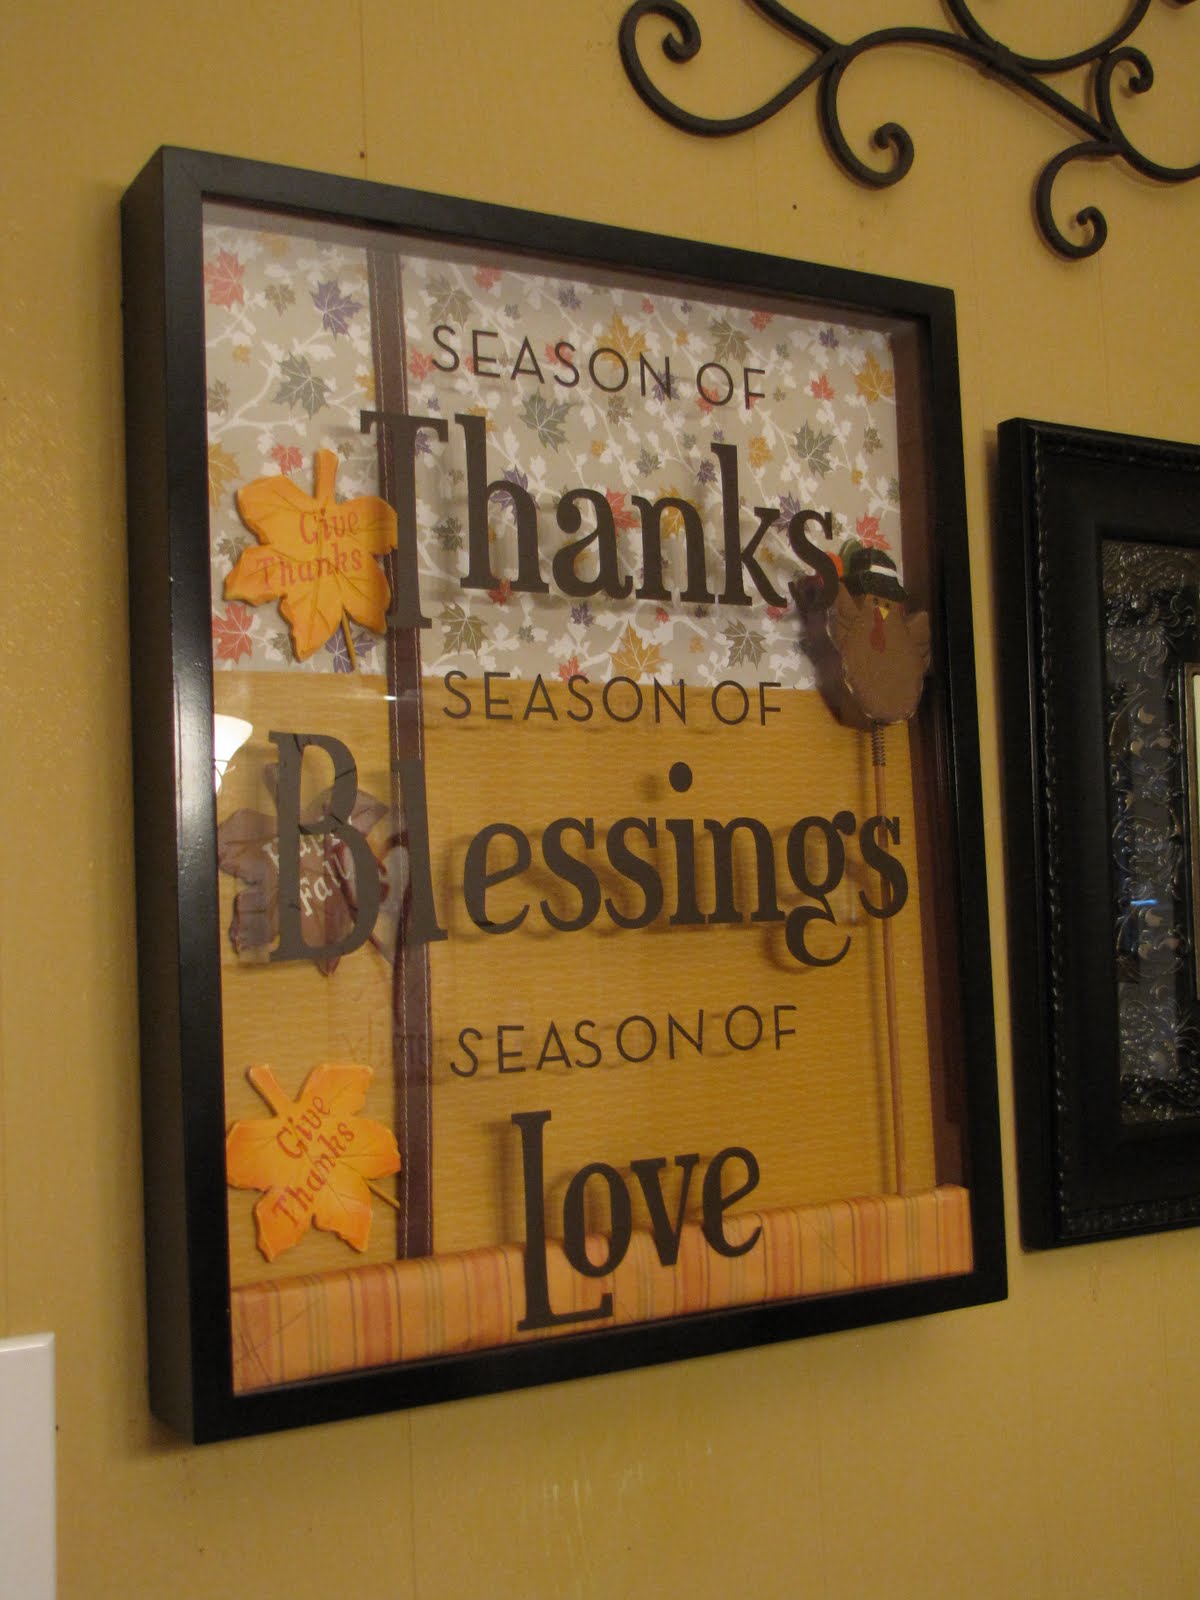
Here it is with the entire wall grouping. I know, I know...whoever put that plug there in the middle of the wall should be shot! Oh well, the joys of owning an old farm house! ha ha ha

I hope this inspires you to create your own seasonal wall hanging.
P.S. The picture in the middle up there is one my daughter made for me last Christmas. Each letter is a photograph that she took. I absolutely love it! I'm trying to do the complete alphabet now with pictures of letters that I find interesting. It's taking awhile to do...but that's another post for a later date.
Thursday, November 11, 2010
Wow Wednesdays - Fresh Flowers

I really love fresh flowers...like seriously LOVE them! Well, my wonderful, magnificent, gorgeous, generous husband did something super fantastic recently! (how many adjectives can you fit in one sentence? ha ha ha)
We went to the Susan G. Komen Race for the Cure kick off party here in our town. It was one of those nice hoity toity things that I really didn't want to go to but did anyway things. You know what I'm talking about. Anyway, they had a silent auction and a live auction to raise money for the Race for the Cure. They had some really cool things. I bid on lots of things in the silent auction and didn't win any of them. :(
However, while I was using the bathroom my husband was bidding on one of the live auction items...fresh flowers once a month for a year from the best flower shop in town. And, guess what? He WON! See, he is wonderful huh?
Well, I got my first bouquet on Tuesday of this week. All I have to say is I'm going to be a very happy girl once a month for a year if this one is any indication as to the flowers I'm going to be getting.
Don't you just love the smell of fresh flowers? I know I do!
Tasty Tuesday - Creme Brulee

*Edited* I thought I posted this already but I guess I forgot...so pretend it's Tuesday! :)
One of my all-time favorite desserts is Creme Brulee. I learned how to make it a couple of years ago and I try to make it at least a few times a year...or more. OK, it's THE all-time favorite dessert of mine and I make it at least once a month. But I mean come on...what's not to like? The first time I had it I fell in love and thought it must be so hard to make. Nope, nada! It is beyond easy. The only downside to the dessert is you need a few special equipment items that the average person may not have. However, the purchase of such items will be well worth the investment.
Items you will need: ramikins, a creme brulee torch (or really any type of torch will do), a large 13 X 9 baking dish.
Ingredients (which will make 5 servings):
1/2 quart of heavy cream
1 vanilla bean
1/3 cup sugar
5 egg yolks
Instructions:
Separate the egg yolks and add to a bowl.
Add sugar and beat with a whisk until it is a light lemon yellow color.
In a sauce pan, pour in the heavy cream.
Slice open the vanilla bean with a small paring knife, then scrape out the insides of the bean and add to the cream in the pan.
Slowly bring the cream and vanilla to a simmer over medium/low heat. You do not want a rolling boil and you don't want to scald the cream. Once you have little bubbles on the side of the pan, remove it from the heat.
Next you want to temper the eggs. What this means is you can't just add all the cream to the egg mixture at once because if you do, the heat from the cream will cook the eggs and you will end up with scrambled eggs, so how you avoid this is called "tempering the eggs". Take a ladel and scoop up a small amount of the cream and add it to the eggs, then beat the eggs again. Continue to do this, one ladel at a time until the temperature of the eggs is slowly raised. Once it is semi-hot you can go ahead and add the remaining cream and vanilla. Whisk everything together one more time.
(now for some of my helpful hints to make this easy...)
Put the ramikens in the baking dish.
Next, add the mixture to the ramikens using the ladel.
Put the baking dish in the oven, then add hot water to the baking dish. The hot water should come up about half way up the ramikens. You can add the hot water before you put it in the oven but I find it easier to add it after and then you aren't trying to juggle it full of water.
Bake at 375 degrees for about 35-45 minutes until the sides of the creme brulee are firm. The middle will still be a little jiggly. Don't overcook!
Remove the baking dish from the oven and then remove the ramikens from the hot water. I use a set of tongs to do this.
Allow to cool for a few minutes and then move them to the refridgerator.
Allow to cool completely in the fridge. It will take at least a couple of hours. The pudding will firm up while it cools.
Once cooled, it's time to turn it into the classic creme brulee!
Sprinkle a light dusting of sugar over the top of each dish.
Light the torch and heat the sugar until it turns into a light brown caramel color.
TaDa! You have just made creme brulee!
Another hint: I like to serve mine with berries that are in season.
Saturday, November 6, 2010
Wonderful Weekends - A West Texas Autumn
We may not have the full realm of color that other areas have this time of the year, but we do have some great signs that it's fall in West Texas. Enjoy!


Subscribe to:
Posts (Atom)