When we remodeled our house in what I now refer to as "The Great Remodel of 1996" we added a 2 car garage, a hallway into the house from said garage, a big game room, and a storage room. The storage room has a door in from the game room and a door in from the garage, in opposite corners of the room. It also has a small built in closet for the air conditioner. The total size of the room is about 12' X 12' (approximate, I actually have not measured it exactly). We keep a freezer in there and it's our "on-site" storage shed in essence. Well, over time this room becomes the catch-all of catch-alls! It catches everything! Finally it gets to the point where it was, where I have only left myself a small walkway to the freezer. Every other spare inch of space is occupied! I've even gone so far this time that I've actually blocked the door to the garage now. Boo Hiss...Bad BikerCandy!!!!
As I'm working on the entry way and Hot Rod is working on our hall bathroom I have spent more time looking for some tool or the other than I've spent on actually working on my projects! The time had come to take a break in all the projects and clean out the storeroom so I could finally find things when I needed them.
So, step 1, take a before picture. In usual BikerCandy fashion, I remembered to do this after about an hour or 2 of starting. So, you'll have to pretend here yet again!
 This is taken from the doorway from the game room. That door on the left goes to the garage. Prior to starting that entire space was covered with stuff. The stuff went all the way around to what you see on the right with just a small walkway to the freezer left.
 This is the view from the other side. So, yeah...it all looked like this! Stuff stacked on top of stuff, stacked on top of stuff. Definitely dangerous too. Anytime I did actually find something I was looking for, getting it out was an entirely different challenge. You had to be very careful removing anything because it was all so delicately balanced that one small change and it all came tumbling down!
So, step 1: Clean it all out completely to just an empty room! This meant we moved both of the cars out of the garage and pulled Hot Rod's bike down to the back of the garage by the door. Now the garage was empty and ready to work as my new storage staging area. I created 4 stacks. One was trash to be thrown away. One was stuff that needed to come back into the room. One was stuff I wanted to keep but didn't use all the time (later projects, etc) to be moved to the barn. The last was stuff I wanted to get rid of...either selling on Craigs List or taking to Goodwill or just giving away to anyone that wants it that I know.
The cleaning out part took the better part of day 1. And by better part I mean I didn't finish until 10:30 at night and I started a little after noon on Saturday. Boy was I beat too! But, here is my finished pride and joy!
 The stack of stuff to go back into the room.
 The stack of stuff to get rid of.
 The stack of stuff to go the barn.
 And lastly, the stack of trash. (no worries, that ladder you see is not really trash, it was just there already so it snuck into the picture) By the way, see that roll of jute right there? It was molded! Has that happened to anyone else? An entire roll of jute completely white with mold! It was disgusting...but I digress, back to the post.
And...here's the room completely empty with the exception of the freezer and the shelving we have for this room.
 Uh, yeah, don't mind that ugly pink wall shall we? Let's just say that was my decor of choice when I was using this room as a scrapbook space. Hey, don't judge! It actually matched some wicked scrapbook paper and it did make me smile. I really, really, really wanted to paint over it and all the walls but we just didn't have time to do it this weekend and I wanted to get this done. Next time we reorganize, painting is definitely on the agenda. In the meantime, I just try to ignore the ugly builders white walls covered in dirt and grime and the pink psychadelic wall. :)
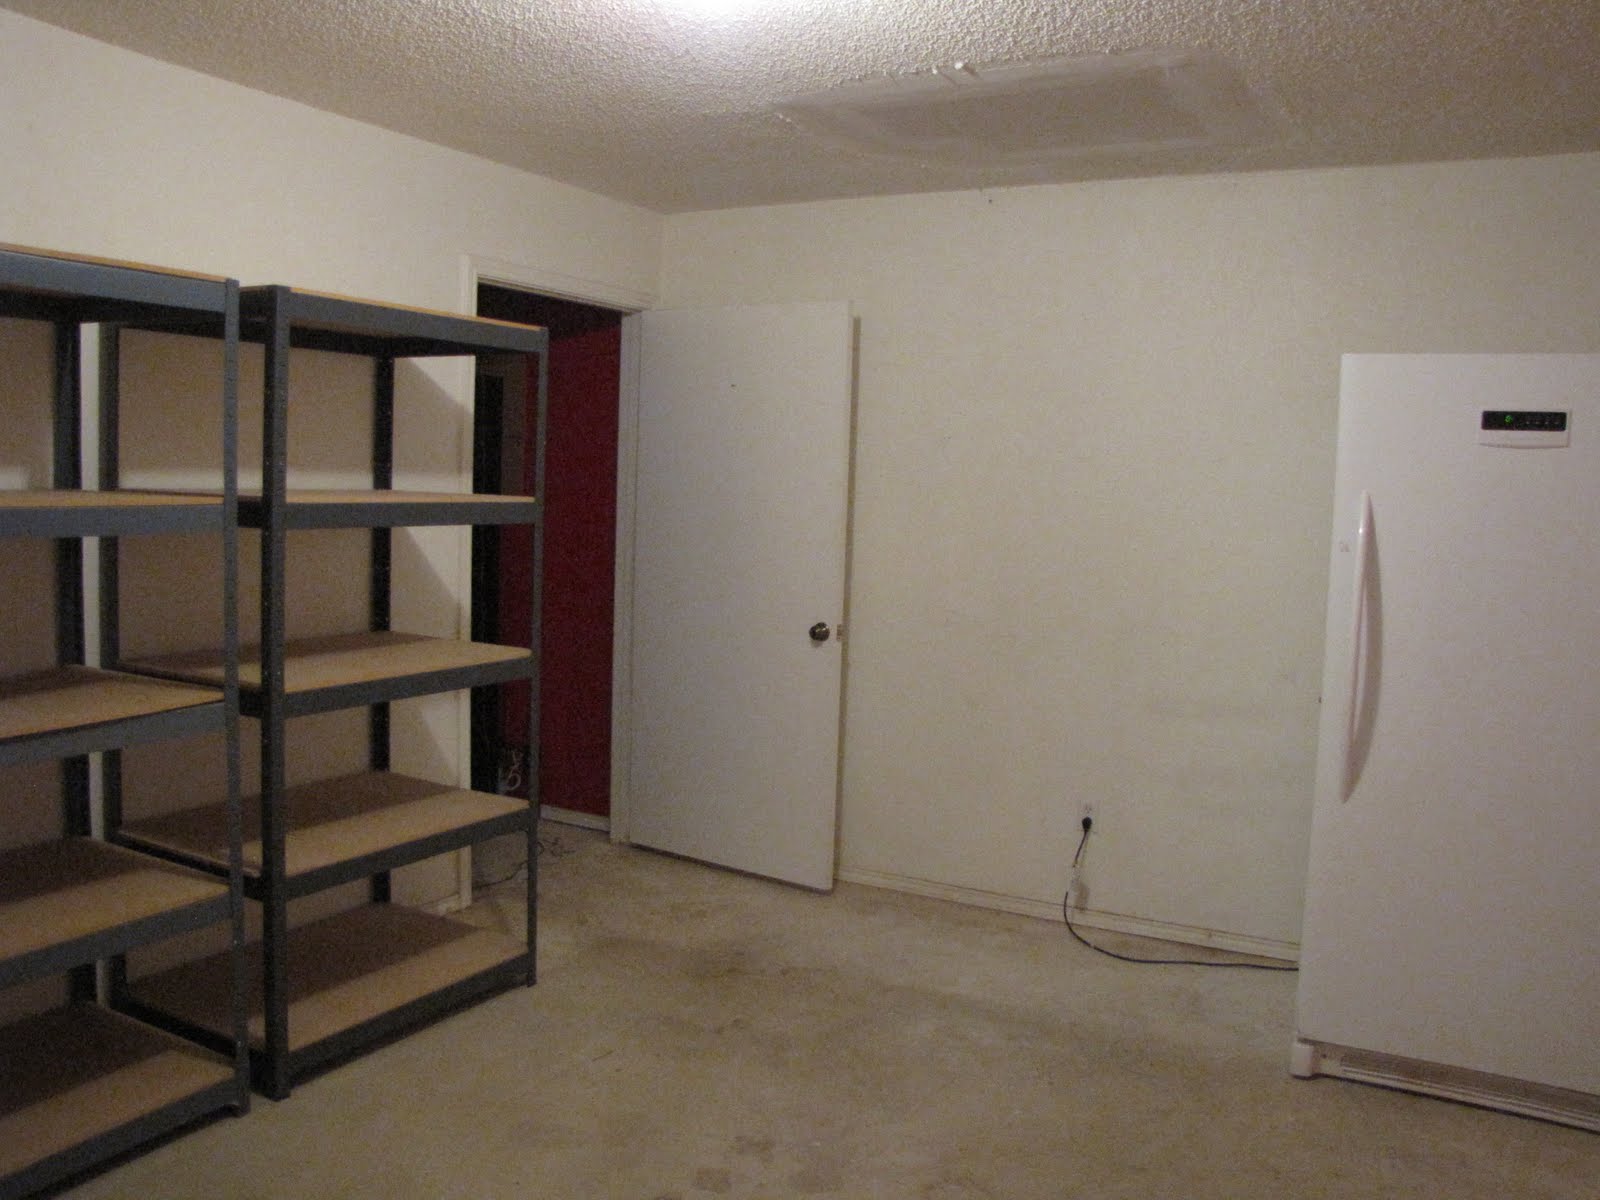 Those are the shelves that were there originally. You probably didn't even notice them in the before pictures because they were covered in junk both on them and in front of them! The freezer did get moved to a new wall, closer to the plug and where we needed it for the new arrangement.
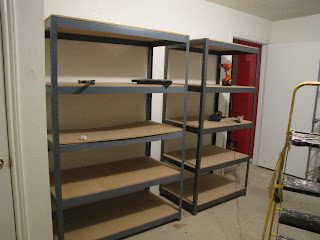
Step 2: Build the Ikea shelf units that have been sitting in my entry way for over a year in their boxes. Yep, over a year these puppies have been sitting in my entry way. They were bought for my closet redo last year but they didn't fit and I've been saving them to use in here or the laundry room. Here won out! I absolutely LOVE these units. They are wonderful and big and sturdy to boot!
 Hot Rod put the 2 units together for me while I worked on another project. I took one of the rolling wire shelf units that was in my kitchen loaded full of junk and emptied it out. Anything that needed to stay in the kitchen got moved to the other wire shelf I have in there. Anything that I needed to keep but not necessarily in the kitchen got set aside for now. Then I moved the shelf unit to the store room. This is going to serve as my out of kitchen pantry. I don't have a pantry in my house so these wire shelves have been serving that purpose for awhile. But, they made my kitchen look messy and unkept no matter how clean my kitchen was. So, by moving this one out it really opened up the walkway in the kitchen and it brought in some much needed more shelving!
 I had 2 rolls of this plastic liner stuff also from Ikea so I was able to line 2 of the shelves, thus making them a semi-solid surface so things wouldn't slip through the wires.
Nothing had to be done to the old shelf units. Just cleaned them off and they were ready to use again.
 So, now it was time to start loading things back in. Remember that stack? If not, here is another picture of everything that needed to come back into the room.
 So, I just took it slow and worked methodically through the pile. I worked from about noon until about 9:00 pm when I finally called it done. My first step was to load the stuff that was taken off the shelf in the kitchen and then move all of the stuff that should belong in a pantry. Stuff like my roasting pan, my buffet server, my chargers for 20 settings...in 2 different colors, extra martini glasses, pitchers for parties, etc, etc, etc. We do quite a bit of entertaining so I need all of this stuff, I just don't need it in the kitchen on a day to day basis so this was going to work out perfectly. Still handy but not out in the way! Oh, and of course all of the beer making supplies needed to go on these shelves. Everything FIT! Even have a few inches here and there to spare! :)
 Next step was to install what little pieces I had for the Ikea shelves. I really didn't have that much left over from the closet install but I made use of what I had. I had 3 shelves, 1 drawer, and one rod. OK...let's make that work until I can make another trip to Ikea which won't be until mid July. I went ahead and hung the rod up at the highest level it would go. I have to get a stool to reach it but for what I'm using it for, it's no big deal. I hung up all of our Halloween costumes there. I also got bags for the accessories and hung them up too. On the bottom of the unit, I just stacked a few of the bigger things, like the ice chest and the crate with all of the extension cords in it.
 I put all of the other pieces in the other unit so I basically completed it. This one is used for a couple of things. I put off-season holiday decor on the top shelf (Halloween, Easter, and 4th of July stuff...Christmas stays in the attic because my Christmas stuff would fill this entire room!) The rest of the shelves have all of our tools and hardware type items. Screws, nails, stapler, sander, hammers, etc. I am using the drawer as basically a pull out shelf. All of our highly used things will go in there so you will be able to pull the drawer out and find what you need quickly. Can I hear a "heck yeah!"?
 There is a little space left between the new shelves and the freezer. The space was actually perfect for the bigger beer making supplies. All of the buckets, bottles, and CO2 tank was put there. It fit perfectly and all completely out of the way. We angled the freezer for a reason. The shelves from Ikea barely fit on that wall and with the freezer flush against the wall it didn't open completely. By angling the freezer now the door opens perfectly wide open and we still could put the shelves against that wall. Also, the tall dark shelves almost cover the ugly pink wall. So they are pulling double duty! Storage and Coverage all in one. I was able to make use of this shoe shelf I happened to have too. Inadvertently I used plastic shoe size boxes for several things (like nails, screws, sand paper, etc). I put the shoe shelf on one of the shelves and then the boxes stacked in there perfectly and I won't have to pull all of them out to get to something in the bottom box anymore! I love it when a plan comes together like that don't you?
 I claimed the larger of the existing shelves as my own. This is going to be my current project staging area. I'm using this as my decorative storage and my trash 2 treasure projects currently being done. I'm in heaven! I loaded it full too! It has stuff that I'm not using right now but I still love and every now and then I change things out and I'll be able to come in here and "shop" here first before heading out to buy anything.
 I went ahead and brought my 2 new tables in here too for now. I really plan on working on them next weekend though so they won't be there long. I'm really trying hard to keep the floor completely clear of any and everything! I did put all the spray paint here but once I get to go back to Ikea and get another shelf I'm moving all of my "tools" to that shelf. All of my spray paint, cans of paint, removers, adhesives, etc will go over there. That will free up another shelf here for me which I need. I sort of had to spill over onto one of the shelves next to this one. Yes, I took one of Hot Rod's shelves! But...he had 2 completely empty shelves when all was said and done and mine were chock full! I needed just a little more space. I told him it would just be until we got back to Ikea and I could get the other shelf. He reluctanly agreed. Bless him!
 So, this is his shelf unit. I have a few things stacked between the 2 units, these are all the larger art pieces. I do have the second to the bottom shelf with my stuff on it. The bottom shelf has his tool boxes and the top shelf has his motorcycle stuff on it. The only other things he has in here are his old trumpet from high school and a putter. Men? Who can figure them out because I sure can't! ha ha ha
And, here it is...the finished room! All done, all cleaned out, all organized, all WONDERFUL! All it took was a bunch of effort and a weekend at home. No money was spent on this AT ALL! I already had every single thing I used in the making of this store room.

 Hot Rod put the 2 units together for me while I worked on another project. I took one of the rolling wire shelf units that was in my kitchen loaded full of junk and emptied it out. Anything that needed to stay in the kitchen got moved to the other wire shelf I have in there. Anything that I needed to keep but not necessarily in the kitchen got set aside for now. Then I moved the shelf unit to the store room. This is going to serve as my out of kitchen pantry. I don't have a pantry in my house so these wire shelves have been serving that purpose for awhile. But, they made my kitchen look messy and unkept no matter how clean my kitchen was. So, by moving this one out it really opened up the walkway in the kitchen and it brought in some much needed more shelving!
 I had 2 rolls of this plastic liner stuff also from Ikea so I was able to line 2 of the shelves, thus making them a semi-solid surface so things wouldn't slip through the wires.
Nothing had to be done to the old shelf units. Just cleaned them off and they were ready to use again.
 So, now it was time to start loading things back in. Remember that stack? If not, here is another picture of everything that needed to come back into the room.
 So, I just took it slow and worked methodically through the pile. I worked from about noon until about 9:00 pm when I finally called it done. My first step was to load the stuff that was taken off the shelf in the kitchen and then move all of the stuff that should belong in a pantry. Stuff like my roasting pan, my buffet server, my chargers for 20 settings...in 2 different colors, extra martini glasses, pitchers for parties, etc, etc, etc. We do quite a bit of entertaining so I need all of this stuff, I just don't need it in the kitchen on a day to day basis so this was going to work out perfectly. Still handy but not out in the way! Oh, and of course all of the beer making supplies needed to go on these shelves. Everything FIT! Even have a few inches here and there to spare! :)
 Next step was to install what little pieces I had for the Ikea shelves. I really didn't have that much left over from the closet install but I made use of what I had. I had 3 shelves, 1 drawer, and one rod. OK...let's make that work until I can make another trip to Ikea which won't be until mid July. I went ahead and hung the rod up at the highest level it would go. I have to get a stool to reach it but for what I'm using it for, it's no big deal. I hung up all of our Halloween costumes there. I also got bags for the accessories and hung them up too. On the bottom of the unit, I just stacked a few of the bigger things, like the ice chest and the crate with all of the extension cords in it.
 I put all of the other pieces in the other unit so I basically completed it. This one is used for a couple of things. I put off-season holiday decor on the top shelf (Halloween, Easter, and 4th of July stuff...Christmas stays in the attic because my Christmas stuff would fill this entire room!) The rest of the shelves have all of our tools and hardware type items. Screws, nails, stapler, sander, hammers, etc. I am using the drawer as basically a pull out shelf. All of our highly used things will go in there so you will be able to pull the drawer out and find what you need quickly. Can I hear a "heck yeah!"?
  There is a little space left between the new shelves and the freezer. The space was actually perfect for the bigger beer making supplies. All of the buckets, bottles, and CO2 tank was put there. It fit perfectly and all completely out of the way. We angled the freezer for a reason. The shelves from Ikea barely fit on that wall and with the freezer flush against the wall it didn't open completely. By angling the freezer now the door opens perfectly wide open and we still could put the shelves against that wall. Also, the tall dark shelves almost cover the ugly pink wall. So they are pulling double duty! Storage and Coverage all in one. I was able to make use of this shoe shelf I happened to have too. Inadvertently I used plastic shoe size boxes for several things (like nails, screws, sand paper, etc). I put the shoe shelf on one of the shelves and then the boxes stacked in there perfectly and I won't have to pull all of them out to get to something in the bottom box anymore! I love it when a plan comes together like that don't you?
 I claimed the larger of the existing shelves as my own. This is going to be my current project staging area. I'm using this as my decorative storage and my trash 2 treasure projects currently being done. I'm in heaven! I loaded it full too! It has stuff that I'm not using right now but I still love and every now and then I change things out and I'll be able to come in here and "shop" here first before heading out to buy anything.
  I went ahead and brought my 2 new tables in here too for now. I really plan on working on them next weekend though so they won't be there long. I'm really trying hard to keep the floor completely clear of any and everything! I did put all the spray paint here but once I get to go back to Ikea and get another shelf I'm moving all of my "tools" to that shelf. All of my spray paint, cans of paint, removers, adhesives, etc will go over there. That will free up another shelf here for me which I need. I sort of had to spill over onto one of the shelves next to this one. Yes, I took one of Hot Rod's shelves! But...he had 2 completely empty shelves when all was said and done and mine were chock full! I needed just a little more space. I told him it would just be until we got back to Ikea and I could get the other shelf. He reluctanly agreed. Bless him!
 So, this is his shelf unit. I have a few things stacked between the 2 units, these are all the larger art pieces. I do have the second to the bottom shelf with my stuff on it. The bottom shelf has his tool boxes and the top shelf has his motorcycle stuff on it. The only other things he has in here are his old trumpet from high school and a putter. Men? Who can figure them out because I sure can't! ha ha ha
And, here it is...the finished room! All done, all cleaned out, all organized, all WONDERFUL! All it took was a bunch of effort and a weekend at home. No money was spent on this AT ALL! I already had every single thing I used in the making of this store room.

1 comment:
That's a lot of work.
Why would I judge.
My basement is a disaster area.
I do pick up and throw out but i swear more shit goes in than out.
I just started converting the movie library into a pantry and have 800 vhs movies i have to dispose of one way or another.
The 500 dvds i'll keep.
I'm the hoarder LOL
Post a Comment